Sunday, March 27, 2011

A Poor Man's Microadjuster

For repeated crosscuts using a miter saw or a crosscut sled or a radial arm saw, nothing beats a stop of some sort for consistent results.  Same thing for some operations on a drill press with a fence. Problem is, setting the stop can be kind of tedious sometimes.  You make a test cut, bump the stop a smidge, make another test cut, bump the stop half a smidge the other way, and so on.

For the price of a drywall screw, though, you can set up a poor man's microadjuster that will eliminate most of the fussing.  Just drive the screw into your stop and use it to register the workpiece instead of the stop itself.  You can then make fine adjustments to your setup simply by turning the screw. A secondary benefit is that sawdust won't get trapped between the workpiece and the stop like it might if the screw wasn't there.

Drywall screws work especially well for this, for a couple of reasons.  First, they're not tapered, which means that they won't become loose in the hole when you back them partway out.  Second, some of them have exactly eight threads per inch.  That means that one turn will conveniently move the screw 1/8", a half turn will move it 1/16", and so on.

Friday, March 25, 2011

File Card Cleans Clogged Sandpaper

"Won't tear!!!"
"Won't clog!!!"
"Lasts forever!!!"

Yeah, right.  Not much you can do when your sandpaper tears or finally wears out.  But when it gets clogged up, give it a couple of swipes with a file card and get back to work.

Sunday, March 20, 2011

Shop Cart with Adjustable Shelves - Free Plan

This fabulous item is a roll around computer cart with adjustable shelves.  At least that's what I thought it was about thirty years ago when I made it and three or four more identical clones.  The idea was to put the monitor and a keyboard on the top shelf, with a printer and the computer itself on the two shelves below. There was no room for a mouse, but that was not a problem because computer mice didn't really catch on until about 1984 when the Apple Macintosh first came out.  Unfortunately, there was also no room for your knees, either.  Duh.  That really was a problem, given that knees had achieved widespread popularity quite some time earlier.

The good news is that these carts were useful anyway.  I wound up using a couple of them for many years to store books, and gave a couple of them away to friends for who knows what.  And I still have one in my shop.  It's handy enough for all sorts of things that I would build another one tomorrow if I was starting over from square one.

The Details

If you want to make one of these yourself, the following pictures link to PDF files containing dimensioned drawings of all the parts.

Side

Base

Shelf

I made the base from a piece of 1/2" plywood, with a 3/4" thick solid skirt to trim up the edges of the plywood and provide a way to attach the sides.  Although the drawing shows it being put together with simple butt joints, you would probably want to use some screws or fancier joinery to make it a little more robust.  There are four pads glued to the underside of the base for mounting some casters.  The exact size and thickness of the pads will depend on the specific casters that you are using.

The shelves are similar to the base, except that the skirt is narrower and they have holes drilled for two T-nuts in each side. Bolts go through the sides of the cart and into these T-nuts to support the shelves. Because the base and the shelves all need to be the same size, it's a good idea to make them all at the same time. I made three shelves (in addition to the base) for each cart, but I don't think I ever used more than two at a time.

The sides are made from 3/4" stock. I used half lap joints at the corners. Mortise and tenon joints would work instead, as would floating tenons or even pocket screws. I drilled 5/16" holes for the 1/4" shelf mounting bolts so it would be easy to get everything lined up when installing the shelves. The sides are glued permanently to the base, and have a 1/4" roundover on all the outside corners just for looks.

The ugly drips of paint are completely optional.

Saturday, March 12, 2011

How Can I Be Stupid? Let Me Count the Ways

I nearly always work using English units, but the rip fence on my European table saw has a metric scale.  So I posted a conversion chart in a convenient spot on the roll-up garage door right next to the saw.  Convenient, that is, until one day I needed the chart when the door happened to be open, and found myself seeking guidance from above.

Duh.

Friday, March 11, 2011

Face Frame Glue-Ups Made Easy

When you're making a cabinet with a face frame, life can get
real interesting when it comes time to glue the face frame to
the carcass. You need to deploy a lot of glue, get everything
positioned properly, and then apply a bunch of cauls and
clamps, all before the glue begins to set up. After the glue
has been spread, it can be especially tricky to keep the face
frame from sliding out of position as you apply the first
couple of clamps.

So, although a simple butt joint is more than adequate to
attach the face frame to the carcass, lots of people use some
sort of joinery there anyway, simply to help align the parts
during glue-up. A shallow rabbet around the back of the face
frame works for this purpose.  Biscuits do, too.

Both of those options take some extra effort, though, and
neither one adds any extra value to the final project. Here's a
different way to keep the face frame and the carcass aligned
during assembly that doesn't involve any superfluous joinery.

Make the carcass and the face frame as usual.  Make the face frame slightly larger than the carcass so you can trim the edges of the frame flush with the sides of the cabinet later.
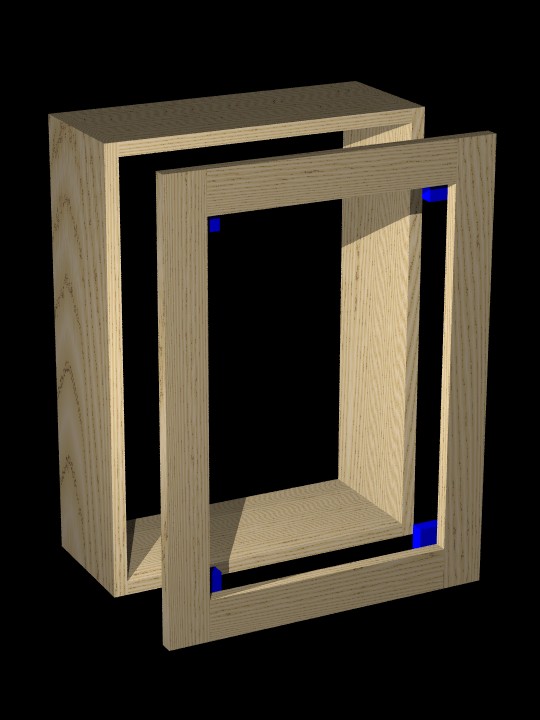
Without applying any glue, carefully position the face frame on the carcass so there is a little bit of overhang all around the edge.  Clamp the parts together in this position.
Next, position four temporary alignment blocks in the corners behind the face frame.  Press these tightly against the carcass walls, and clamp them to the face frame only.
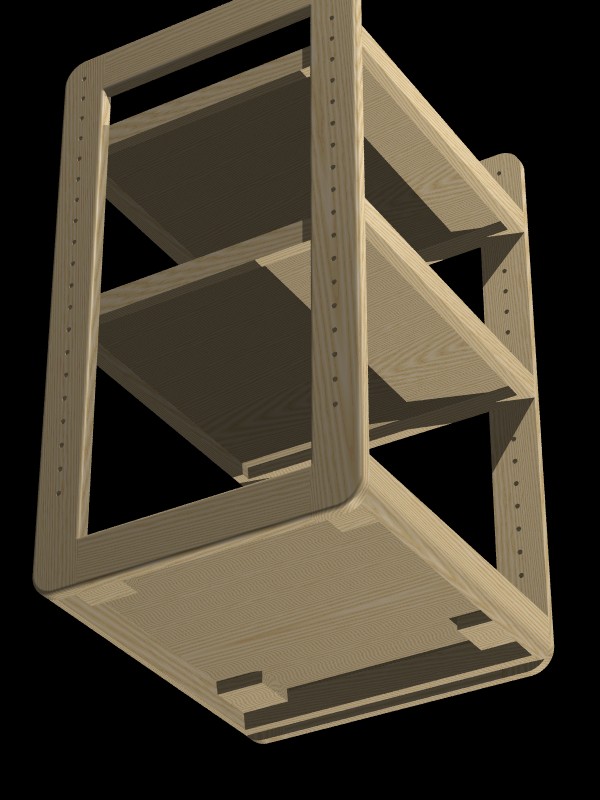
Here's how it looks from the back with the alignment blocks in place.
Now remove the face frame from the carcass, but leave the alignment blocks clamped to the face frame.

At this point, you can go ahead with the actual glue-up.  The temporary blocks will guarantee the alignment of the parts, leaving you with two hands free to juggle your clamps, any excess glue, and your beer.  Just be sure to remove the alignment blocks before you're done, lest some of that excess glue stick them permanently to the inside of the cabinet.

Saturday, March 5, 2011

Low Cost Shop Made Leveling Feet

My shop is in my garage.  The terrain out there is kind of lumpy, with a noticeable slope towards the door.  So when I built my shop furniture, I definitely needed to provide adjustable support of some sort to make up for the uneven floor.

For my first project, I got some fancy feet from Rockler.  These worked great, but after paying about $25 for a set of four, I started looking around for a Plan B.

On my second and subsequent projects, I got by for a lot less money by gluing blocks of wood behind my toe kicks everywhere I wanted a foot.  Then I drilled a hole and embedded a nut in each block to accommodate a carriage bolt.  I potted the nuts in J-B Weld to make sure they would stay put.

If you don't mind a gap of 3/4" or so between the toe kicks and the floor, it's easy to turn the carriage bolts with a Crescent wrench.  If you want the toe kicks closer to the floor, use a hacksaw to make a big fat screwdriver slot in the threaded end of each carriage bolt.  Then you can adjust them through a hole in the cabinet base just like the Rockler guys do.

Wednesday, March 2, 2011

Friction

The other day I was trying to make some lamp stands from some hickory that a friend had given me.  After totally messing them up and having to make them over again out of some other material, I had just a little bit of the hickory left over.

The hickory seemed especially hard and dense, so I decided to turn a mallet.  I found a plan of sorts in an old-time book, fired up the lathe, and had the head made soon enough.  Before removing it from the lathe, I wanted to add some decorative features that were shown in the book.

I had heard that you could burn lines into a turning simply by pressing a piece of wire hard against the wood as it spins in the lathe.  That sounded easy enough.  So I got a piece of soft iron wire, looped one end around each hand to get a good grip, and gave it a go.

Holy catfish, that wire got hot fast.

Duh.